Preface
In this series, we’ll explore some key highlights for a modest implementation of a Stripe integration that brings together the capabilities of Stripe Connect and Stripe Billing for a fictitious business, Oasis Hubs. The business provides customers with access to unique private and commercial workspaces that can be conveniently booked for a given number of hours. Customers will be able to choose between different subscription tiers that will give them access to various workspace listings (hubs) which have been provided by the service vendors (hosts). Hosts will sign up to the platform to provide details of their available workspaces, and get paid monthly based on the number of hours booked for their workspace.
Throughout this series, we will cover topics such as setting up Stripe Connect Onboarding, managing Stripe events, implementing metered billing, and validating subscription logic with test clocks.
Getting Paid
Oasis Hubs’ business model is based on charging for subscriptions that Customers choose from; either Basic, Standard, or Premium. Each level has its own benefits and pricing. Pricing starts at $35 monthly for Oasis Basic, $60 monthly for Oasis Standard, and $120 monthly for Oasis Premium. Each tier comes with 10 hours of hub rental per month, but the hours do not roll over to the following months. If a customer goes over their monthly allotment, they will be charged overage fees for each additional hour.
What about compensating the hosts? Once customers have successfully paid their monthly invoices, the hosts get paid a percent of the total invoice relative to the number of hours a customer used in their listing. For example, if a customer used 10 hours during a given month and 5 of those hours were booked at host A’s listings then host A will get paid 50% of the available funds to be paid out.
Once a customer’s invoice has been paid at the end of a billing cycle, Oasis Hubs will hold on to a portion of the revenue and distribute the remaining available funds between the respective hosts.
Modeling Products and Prices in Stripe
Before we can display pricing tiers to the customers on the website, we must first model them within Stripe as Product and Price objects. Based on the description above, each tier will need to have two prices. One price will represent the fixed monthly subscription price, while the other will be the hourly rate for any accrued overages. What we’ll do is make the overage rate 10% of the monthly fixed rate. The price breakdown will look something like this.
| Subscription | Fixed Monthly | Hourly Overage Rate |
| Oasis Basic | $35 | $3.5 |
| Oasis Standard | $60 | $6.0 |
| Oasis Premium | $120 | $12.0 |
We have options when it comes to creating Products and Prices objects in Stripe. This article will focus on creating all the objects we need using the Stripe .NET library. That will give us access to the ProductService and PriceService classes that we can use to create and attach prices to products for Oasis Hubs.
ProductService productsService = new ProductService();
var prodCreateOptions = new ProductCreateOptions {
   Name = title,
   Description = description,
   Images = new List<string> { fileLink.Url },
   Features =
       features.Select(f => new ProductFeatureOptions { Name = f }).ToList(),
   UnitLabel = "hour",
   Metadata = new Dictionary<string, string> { ["tier.image"] = imageFileName }
};

var newHubProduct = await productsService.CreateAsync(prodCreateOptions);
To create products using the ProductService, we need to populate an instance of the ProductCreateOptions object and pass it to the CreateAsync method as shown above. The only required property is “Name” but providing more detail can be helpful later on in other parts of the application. In the example above, in addition to the name, we’re adding a description, an image URL, a list of features, and the unit label. As mentioned earlier, these properties can be updated later via the Dashboard if needed. Next, we’ll create the prices.
PriceService priceService = new PriceService();

// Create flat price in product
var priceCreateOptions = new PriceCreateOptions {
   Product = newHubProduct.Id,
   Nickname = newHubProduct.Name,
   Currency = "usd",
   UnitAmount = hourlyUnitPrice,
   LookupKey = $"{priceLookupPrefix}_usd",
   Recurring =
       new PriceRecurringOptions { Interval = "month", UsageType = "licensed" }
};

var newProductPrice = await priceService.CreateAsync(priceCreateOptions);

// Update default price
await productsService.UpdateAsync(newHubProduct.Id, new ProductUpdateOptions {
   DefaultPrice = newProductPrice.Id
});
Similar to the ProductService, with the PriceService we have to populate a PriceCreateOptions object and pass it to the CreateAsync method. This class, however, requires a currency code, a unit amount in cents which represents the prices, and also the Id of the Product object the price is associated with.
In the Stripe object model, Products objects can have many attached Prices, but Price objects are attached to one Product.
Since Oasis Hubs needs to have a fixed monthly price for each tier, the “Recurring” property is set on the PriceCreateOptions objects with an “Interval” of “month” and the “UsageType” set to “licensed.” In Stripe, recurring purchases can have a usage type of either “licensed” or “metered.” We can think of “licensed” as a fixed price per quantity. For example, if we were selling a service at $15 per month per user and a company signed up with 10 employees then they would have one monthly subscription at $150 per month. We don’t need to model prices that way with Oasis Hubs, so we will always assume that this quantity for this price is one per customer. Now let’s look at creating the price for the overages.
// Create tiered pricing in product
priceCreateOptions = new PriceCreateOptions {
   Product = newHubProduct.Id,
   Nickname = newHubProduct.Name,
   LookupKey = $"{priceLookupPrefix}_usd_tiered",
   Currency = "usd",
   Tiers =
       new List<PriceTierOptions> { new() { UnitAmount = 0, UpTo = 10 },
                                    new() { UnitAmount = hourlyUnitPrice / 10,
                                            UpTo = PriceTierUpTo.Inf } },
   Recurring =
       new PriceRecurringOptions { Interval = "month", UsageType = "metered" },
   TiersMode = "graduated",
   BillingScheme = "tiered"
};

newProductPrice = await priceService.CreateAsync(priceCreateOptions);
There are some significant differences between the fixed monthly Price object we created previously and the one we’re creating now. First, notice that the “UsageType” is set to “metered.” This is because the price that we’re modeling here is based on the number of additional hours consumed by a customer that month. That also means we’ll need to track usage for each customer as well, but we’ll get to that later on in the article. The next major difference to nice is that the “Tiers” property is being set with a list of pricing tiers. The first one specifies that the first 10 reported hours will not be charged. This makes sense since customers would have already paid for this allotment upfront through the fixed monthly pricing. The second tier for the Price object specifies that each additional hour reported over the 10 initial hours will be charged at 10% of the monthly fixed rate.
Processing Subscriptions
Now that subscription products and prices have been set up in Stripe, the next thing we should probably do is create a page where customers can see them. One of the convenient options at our disposal is the embedded pricing table from Stripe. This low code option allows us to design a pricing table with up to four products that we can embed in any website by just copying the generated code. Through the designer in the Stripe Dashboard, we can set options for tax collection, address collection, enable promotion codes, configure the look and feel, plus many other useful options.
One of the limitations the embedded pricing table has is that it doesn't give us an option to require that the customer is authenticated with an active account before proceeding to a checkout page. For this reason, Oasis Hubs created its own pricing table that’s aware of the user identity we created in the first article of this series.
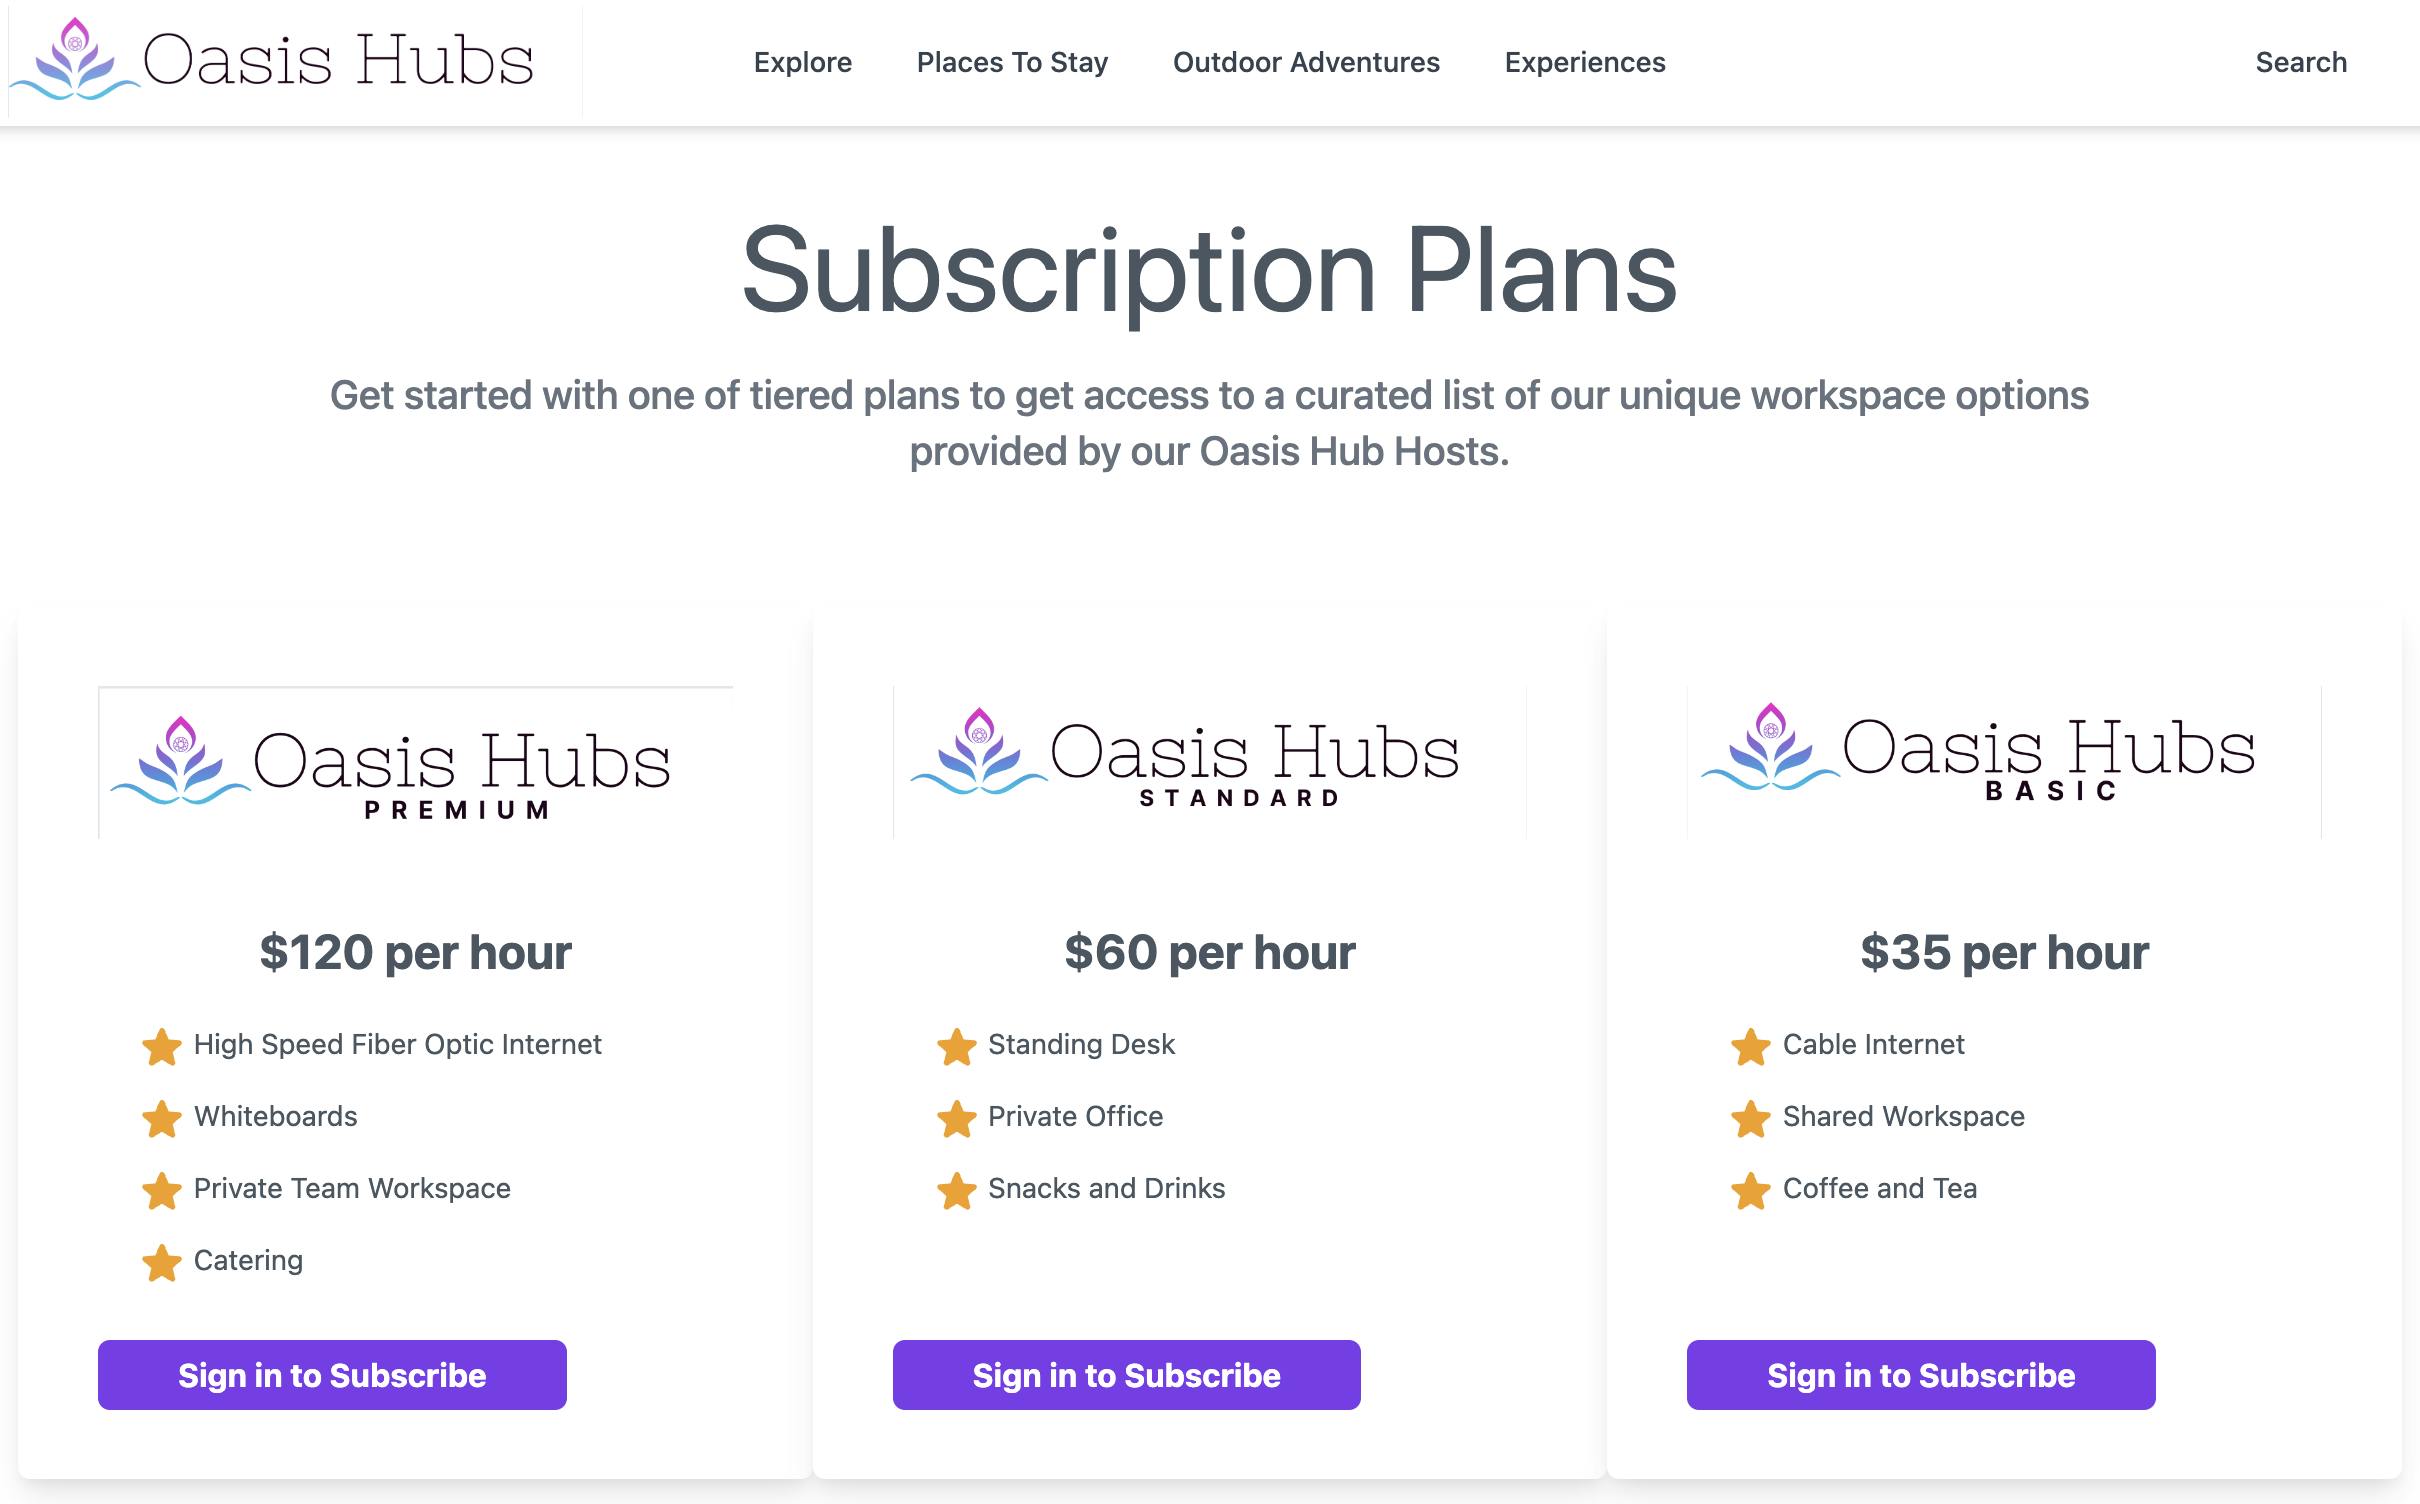
To create this page, we’ll make use of the ProductService we used earlier. This time, instead of creating new products we’ll use it to query for the ones already in the Oasis Hubs Stripe account.
public IEnumerable<Product> HubTierListings { get; set; } =
    Enumerable.Empty<Product>();

public Pricing(UserManager<OasisHubsUser> userManager,
               IStripeClient stripeClient, LinkGenerator linkGenerator,
               ILogger<Pricing> logger) {
   this._userManager = userManager;
   this._stripeClient = stripeClient;
   this._linkGenerator = linkGenerator;
   this._logger = logger;
}

public async Task<IActionResult> OnGetAsync() {
   var productsService = new ProductService(this._stripeClient);

   var options =
       new ProductListOptions { Expand = new() { "data.default_price" },
                                Active = true };

   var products = await productsService.ListAsync(options);
   if (products.Any()) {
      HubTierListings =
          products.Where(p => p.Metadata.ContainsKey(_tierMetaKey));
   }

   return Page();
}
This code sample above shows a snippet of what the PageModel of the pricing page looks like. We populate an instance of the ProductListOptions object and provide it to the ListAsync method of the ProductService class. The set properties let Stripe know that we only want active products and to include the default price in the result set.
<main class="max-w-7xl m-auto px-6">
   <div class="w-full mx-auto bg-white px-5 py-10 text-gray-600">
      <div class="text-center w-3/4 mx-auto">
         <h1 class="text-5xl md:text-6xl mb-5">Subscription Plans</h1>
         <h3 class="font-medium text-xl text-gray-500 mb-10">Get started with one of tiered plans to get access to a curated list of our unique workspace options provided by our Oasis Hub Hosts. </h3>
      </div>
      <div class="max-w-full mx-auto md:flex">
         @foreach (var tier in Model.HubTierListings)
         {
            <vc:tier-pricing-item tier-product="@tier"></vc:tier-pricing-item>
         }
      </div>
   </div>
</main>
Then we’ll iterate through the results within Razor and pass each product to a custom pricing item component we created with a ViewComponent.
<div class="w-full">
      @if (User.Identity?.IsAuthenticated ?? false)
      {
         <form asp-page="/Pricing" method="POST">
            <button type="submit">Subscribe Now</button>
            <input type="hidden" name="lookupKey"
 value="@Model.TierProduct.DefaultPrice.LookupKey"/>
         </form>
      }
      else
      {
         <a asp-page="/signin" asp-route-returnUrl="/pricing">Sign in to Subscribe</a>
      }
</div>
The ViewComponent is mostly static but the button is where most of the interesting bits are. If the user is signed in, we render an HTML form that kicks off the checkout process otherwise we render a button that prompts the user to “Sign in to Subscribe.” Notice that we’re using the LookupKey for the default price for the product as a hidden form field.
Let’s break down the handler method that processes the subscribe request.
var lookupKey = Request.Form["lookupKey"].ToString();

var plOptions = new PriceListOptions {
     LookupKeys = new List<string> { lookupKey, $"{lookupKey}_tiered" }
};

var priceService = new PriceService(this._stripeClient);
var prices = await priceService.ListAsync(plOptions);
var lineItems = prices.Select(p => new SessionLineItemOptions {
   Price = p.Id, Quantity = !p.LookupKey.EndsWith("_tiered") ? 1 : null
}).ToList();
First we retrieve the Price objects associated with the specified lookup keys. The line items here should always have two prices. One of the fixed monthly and another for the tiered usage.
 var basePageUri = _linkGenerator.GetUriByPage(this.HttpContext, "/Index");
var scOptions = new SessionCreateOptions {
   Customer = user.StripeCustomerId,
   CustomerUpdate = new SessionCustomerUpdateOptions { Address = "auto" },
   LineItems = lineItems,
   Mode = "subscription",
   AutomaticTax = new SessionAutomaticTaxOptions { Enabled = true },
   SuccessUrl = $"{basePageUri}/PaymentComplete?session_id={{CHECKOUT_SESSION_ID}}",
   CancelUrl = $"{basePageUri}",
   ConsentCollection = new() { Promotions = "auto" },
   AllowPromotionCodes = true
};

var sessionService = new SessionService(this._stripeClient);
var session = await sessionService.CreateAsync(scOptions);
return Redirect(session.Url);
Then we create a new checkout session for the logged in user. Following a similar pattern as other Stripe services, we create an instance of the SessionCreateOptions object and pass it on to the CreateAsync method of the SessionService class. The session we’re creating will let Stripe know that we want to provision a hosted payment form for our logged in user with the given products; in this case it’s an Oasis Subscription. Some essential properties to pay attention to here are “Customer,” “Mode,” and “LineItems.” Also notice the SuccessUrl and CancelUrl properties which are used to redirect customers back to the main Oasis Hubs website to different URLs depending on if they successfully completed the checkout form or not.
After creating the checkout session, we can redirect the customer to the hosted checkout page using the URL property.
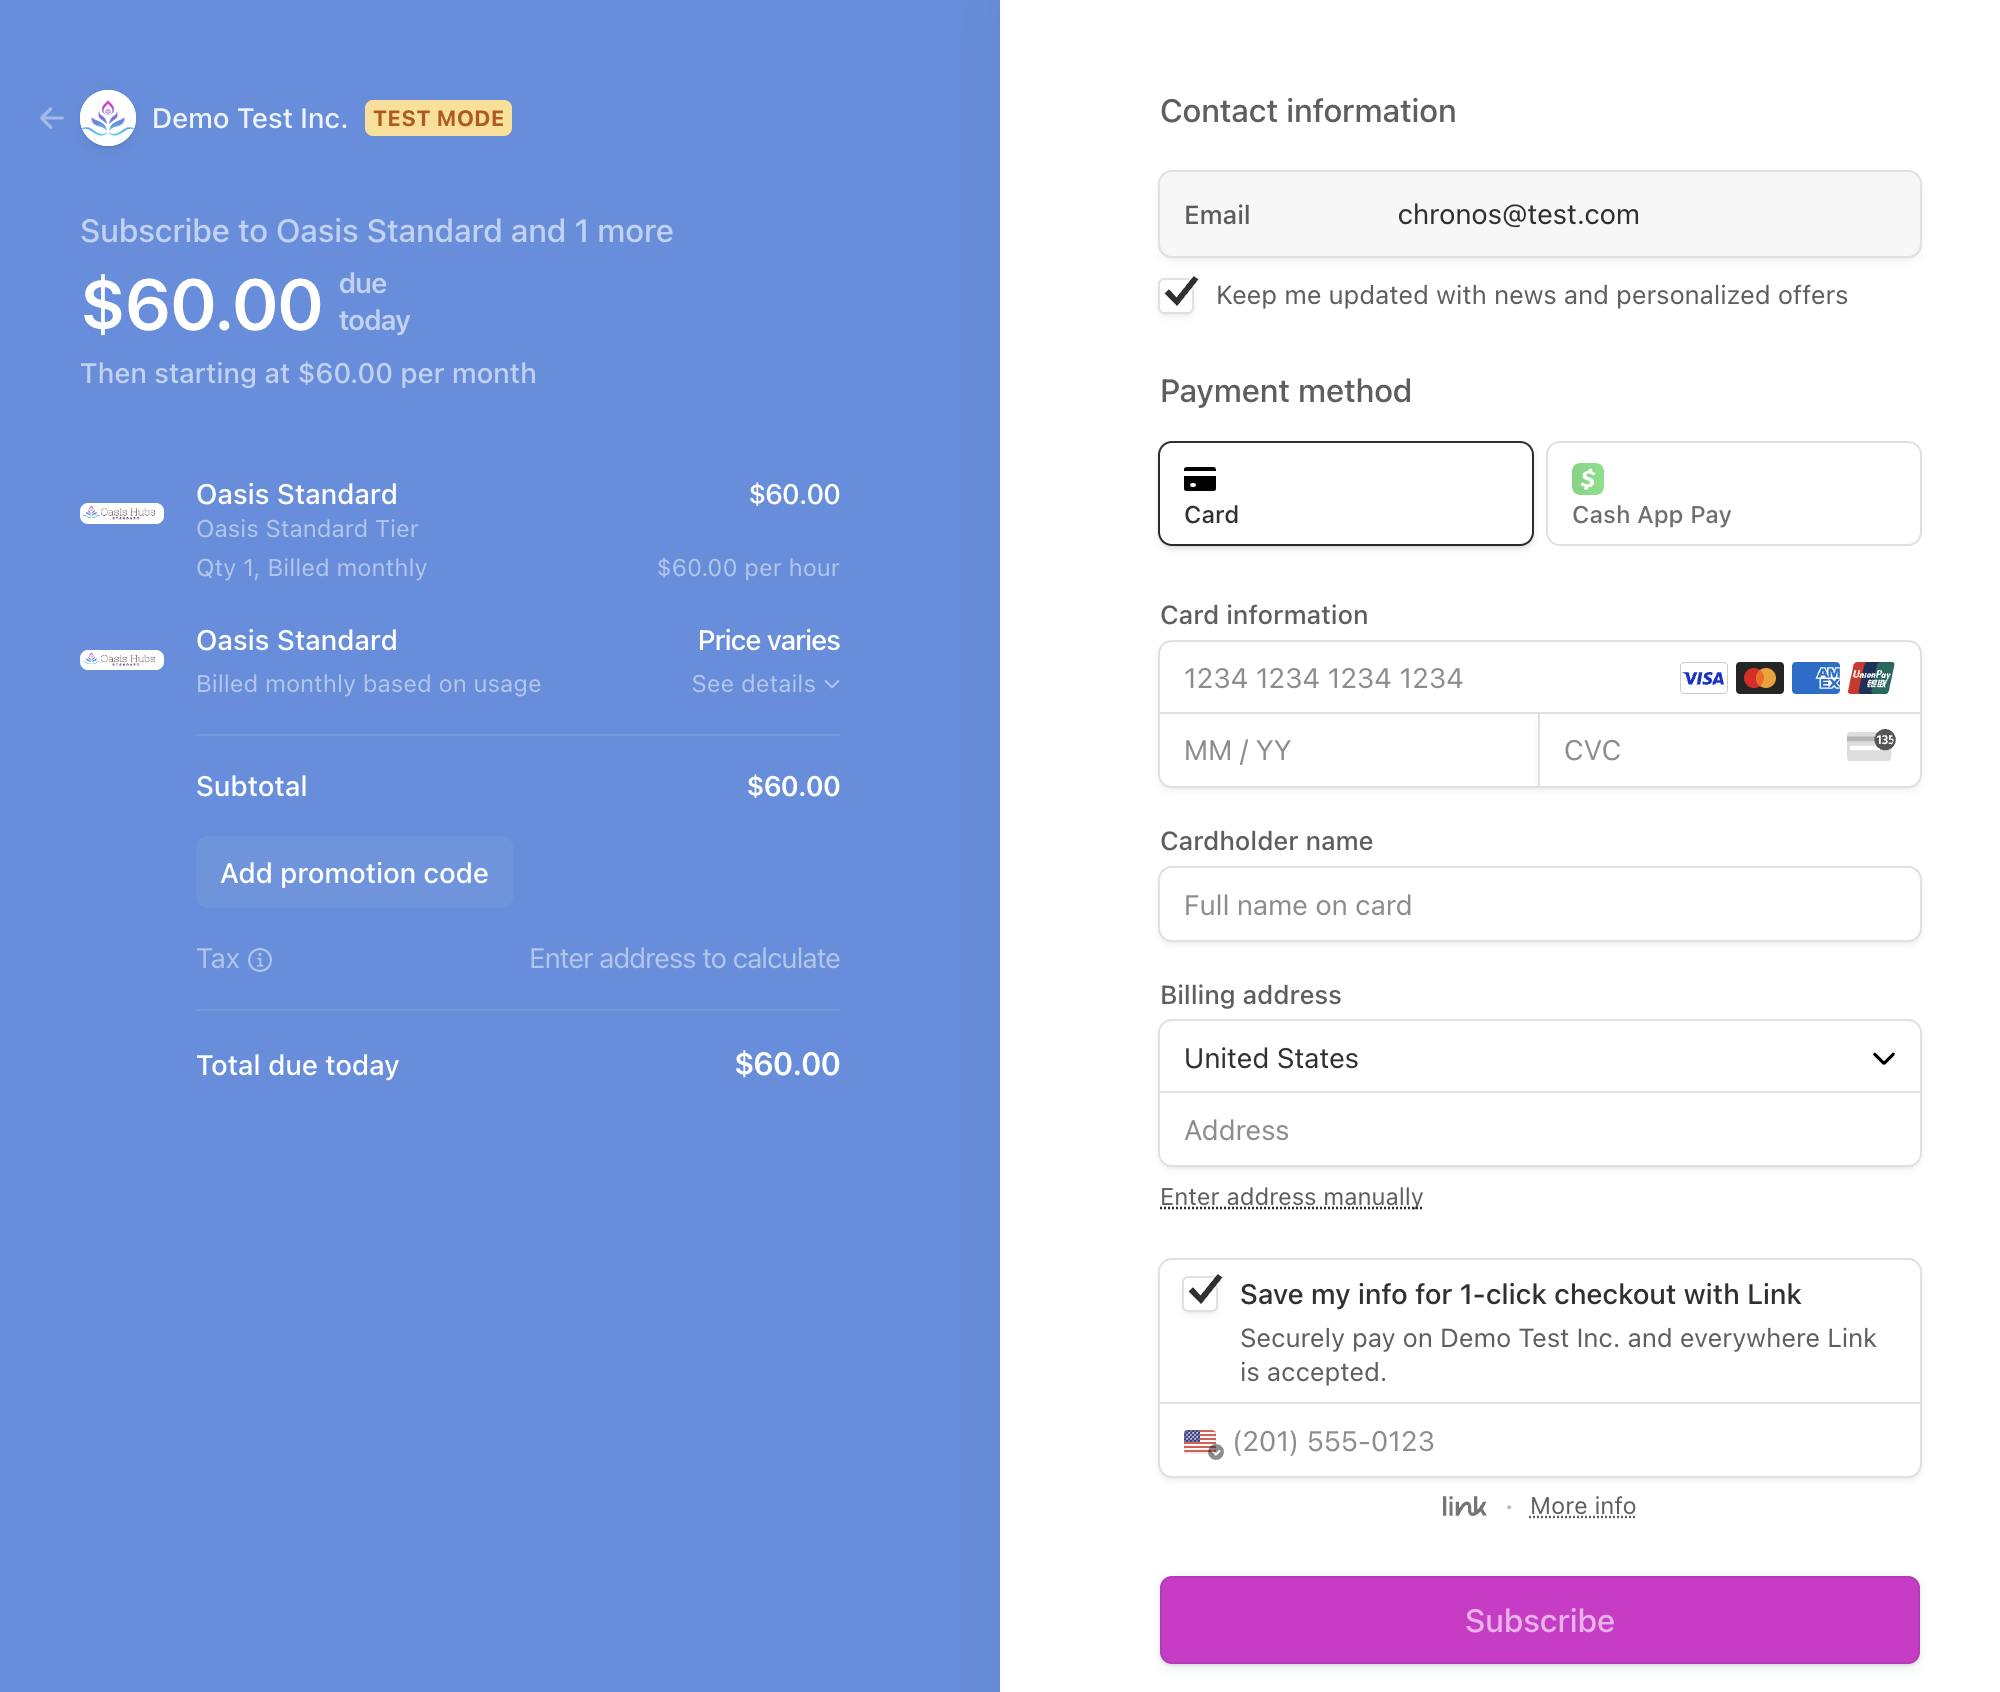
After the customer completes checkout, they’ll get redirected to the URL set on the SuccessUrl property of the session. As the payment is being processed, Stripe will generate a series of events which can be observed and processed using our webhook handler we created using the WebhooksController in the previous article of this series.
switch (stripeEvent.Type) {
case Events.InvoicePaid:
{
  var invoice = (stripeEvent.Data.Object as Invoice) ! ;
      await this._commandProcessor.PostAsync(new InitiateFundsTransferCommand(invoice));
  break;
  }
case Events.CustomerSubscriptionCreated:
{
  var newSubscription = (stripeEvent.Data.Object as Subscription) ! ;
    await this._commandProcessor.PostAsync(
      new ActivateCustomerSubscriptionCommand(newSubscription));
    break;
  }
case Events.CustomerSubscriptionUpdated:
{
  var updatedSubscription = (stripeEvent.Data.Object as Subscription) ! ;
   await this._commandProcessor.PostAsync(
      new ActivateCustomerSubscriptionCommand(updatedSubscription));
  break;
  }
default:
  _logger.LogInformation("Unhandled event type: {StripeEvent}", stripeEvent.Type);
  break;
}
Some of the events we should pay attention to include customer.subscription.created, customer.subscription.deleted, customer.subscription.paused and customer.subscription.updated. Here is where we can start any associated workflows, adjust user permissions, or update any data tables related to the customer’s account. One of the workflows for Oasis Hubs sets the ActiveSubscriptionId and HasSubscriptionActive properties on the OasisHubUser record for the customer. We introduced this type in the first article of this series.
Subscription Management
It is fair to assume that, after subscribing, customers might want to make adjustments to their subscriptions. They will expect to be able to update their billing information, view their invoice history, upgrade their subscriptions, or even cancel their subscriptions entirely. As responsible engineers, we should build these types of capabilities into our applications. But what if we don’t have too?
If we prefer not to spend the engineering cycles on this type of work, Stripe’s Customer Portal can provide us with a low-code option for adding these features to our applications.
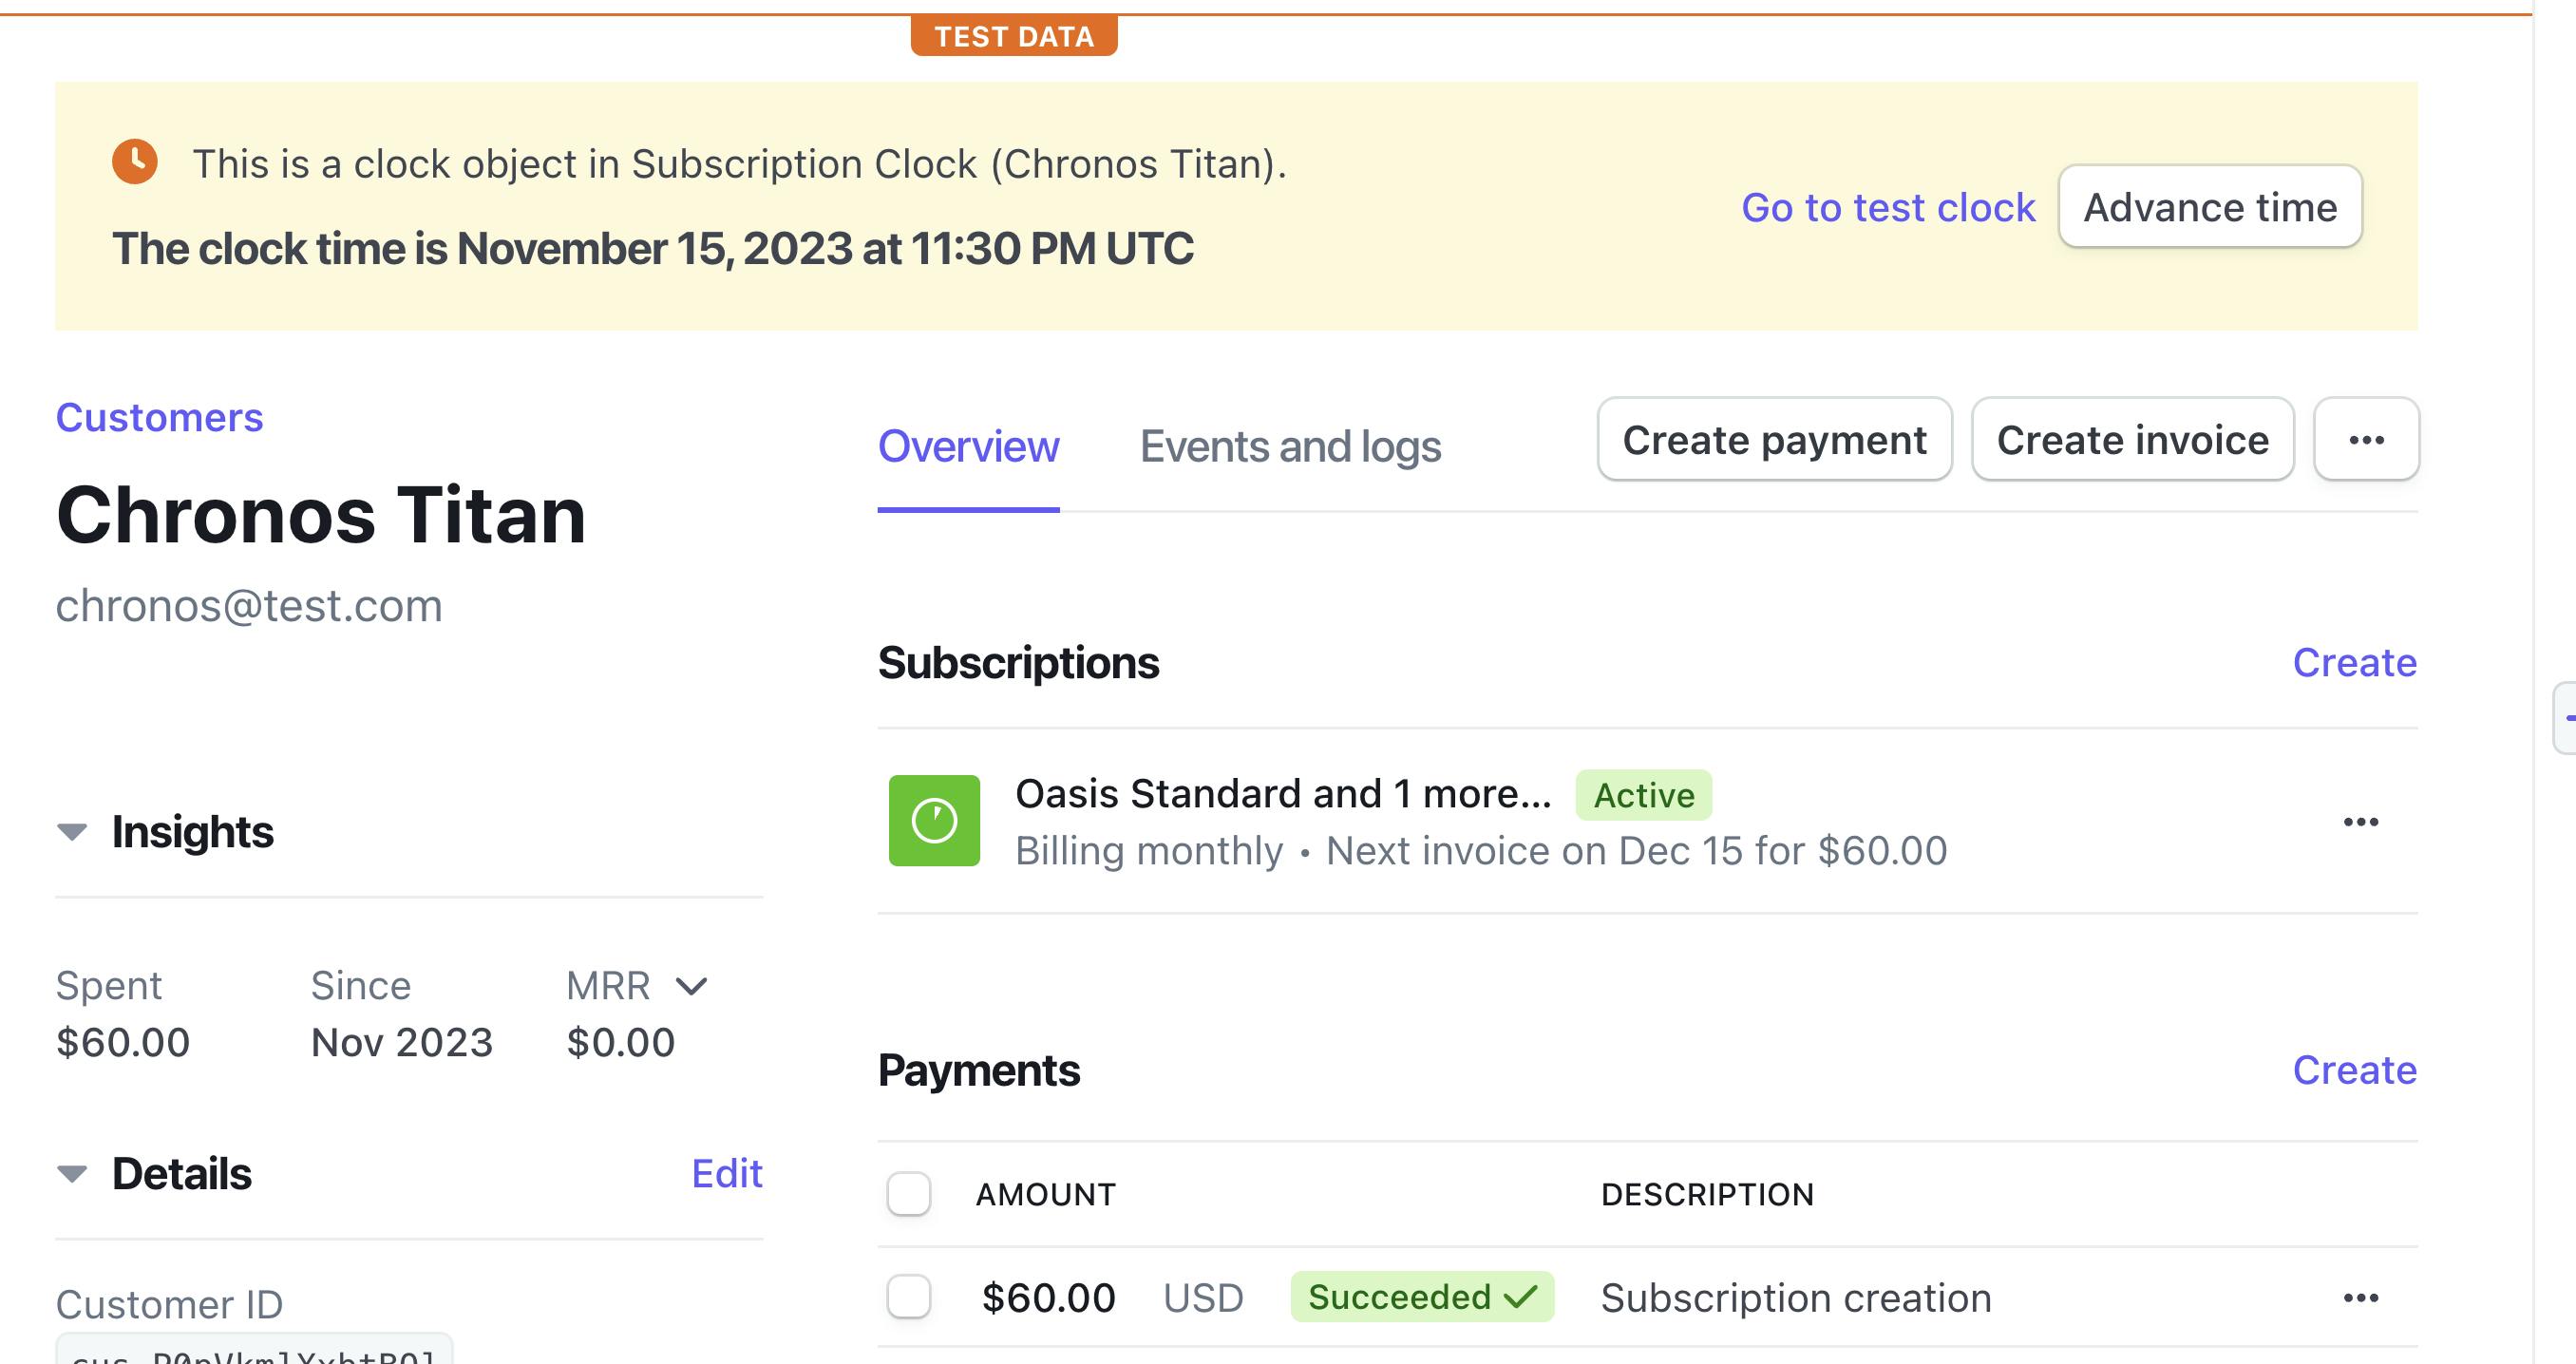
To enable the Customer Portal, go to the Stripe Dashboard, use the search bar to search for the setting, then click on the “Enable” button on the configuration page. We will be able to toggle features on or off to suit our needs. To incorporate the portal into an application, we’ll have to create a new session for the customer and redirect them to using the generated URL. This is very similar to the checkout session we created earlier.
   [Authorize]
   [HttpPost("create-portal-session")]
   public async Task<IActionResult> CreatePortalSession() {
      var user = await _userManager.GetUserAsync(User);
      if (user == null) {
         return RedirectToPage("/SignIn");
      }

      var basePageUri = _linkGenerator.GetUriByPage(this.HttpContext, "/Index");
      var options = new Stripe.BillingPortal.SessionCreateOptions
      {
         Customer = user.StripeCustomerId,
         ReturnUrl = basePageUri
      };
      var service = new Stripe.BillingPortal.SessionService(_stripeClient);
      var portalSession = await service.CreateAsync(options);
      return Redirect(portalSession.Url);
   }
It’s important that these sessions are only shared with authenticated users since it exposes the ability to view and update sensitive information like the customer’s billing address and payment information.
To create a portal session, we’ll need the Id for the Stripe Customer object and a return URL the customer should be redirected when they’re ready to leave the portal.
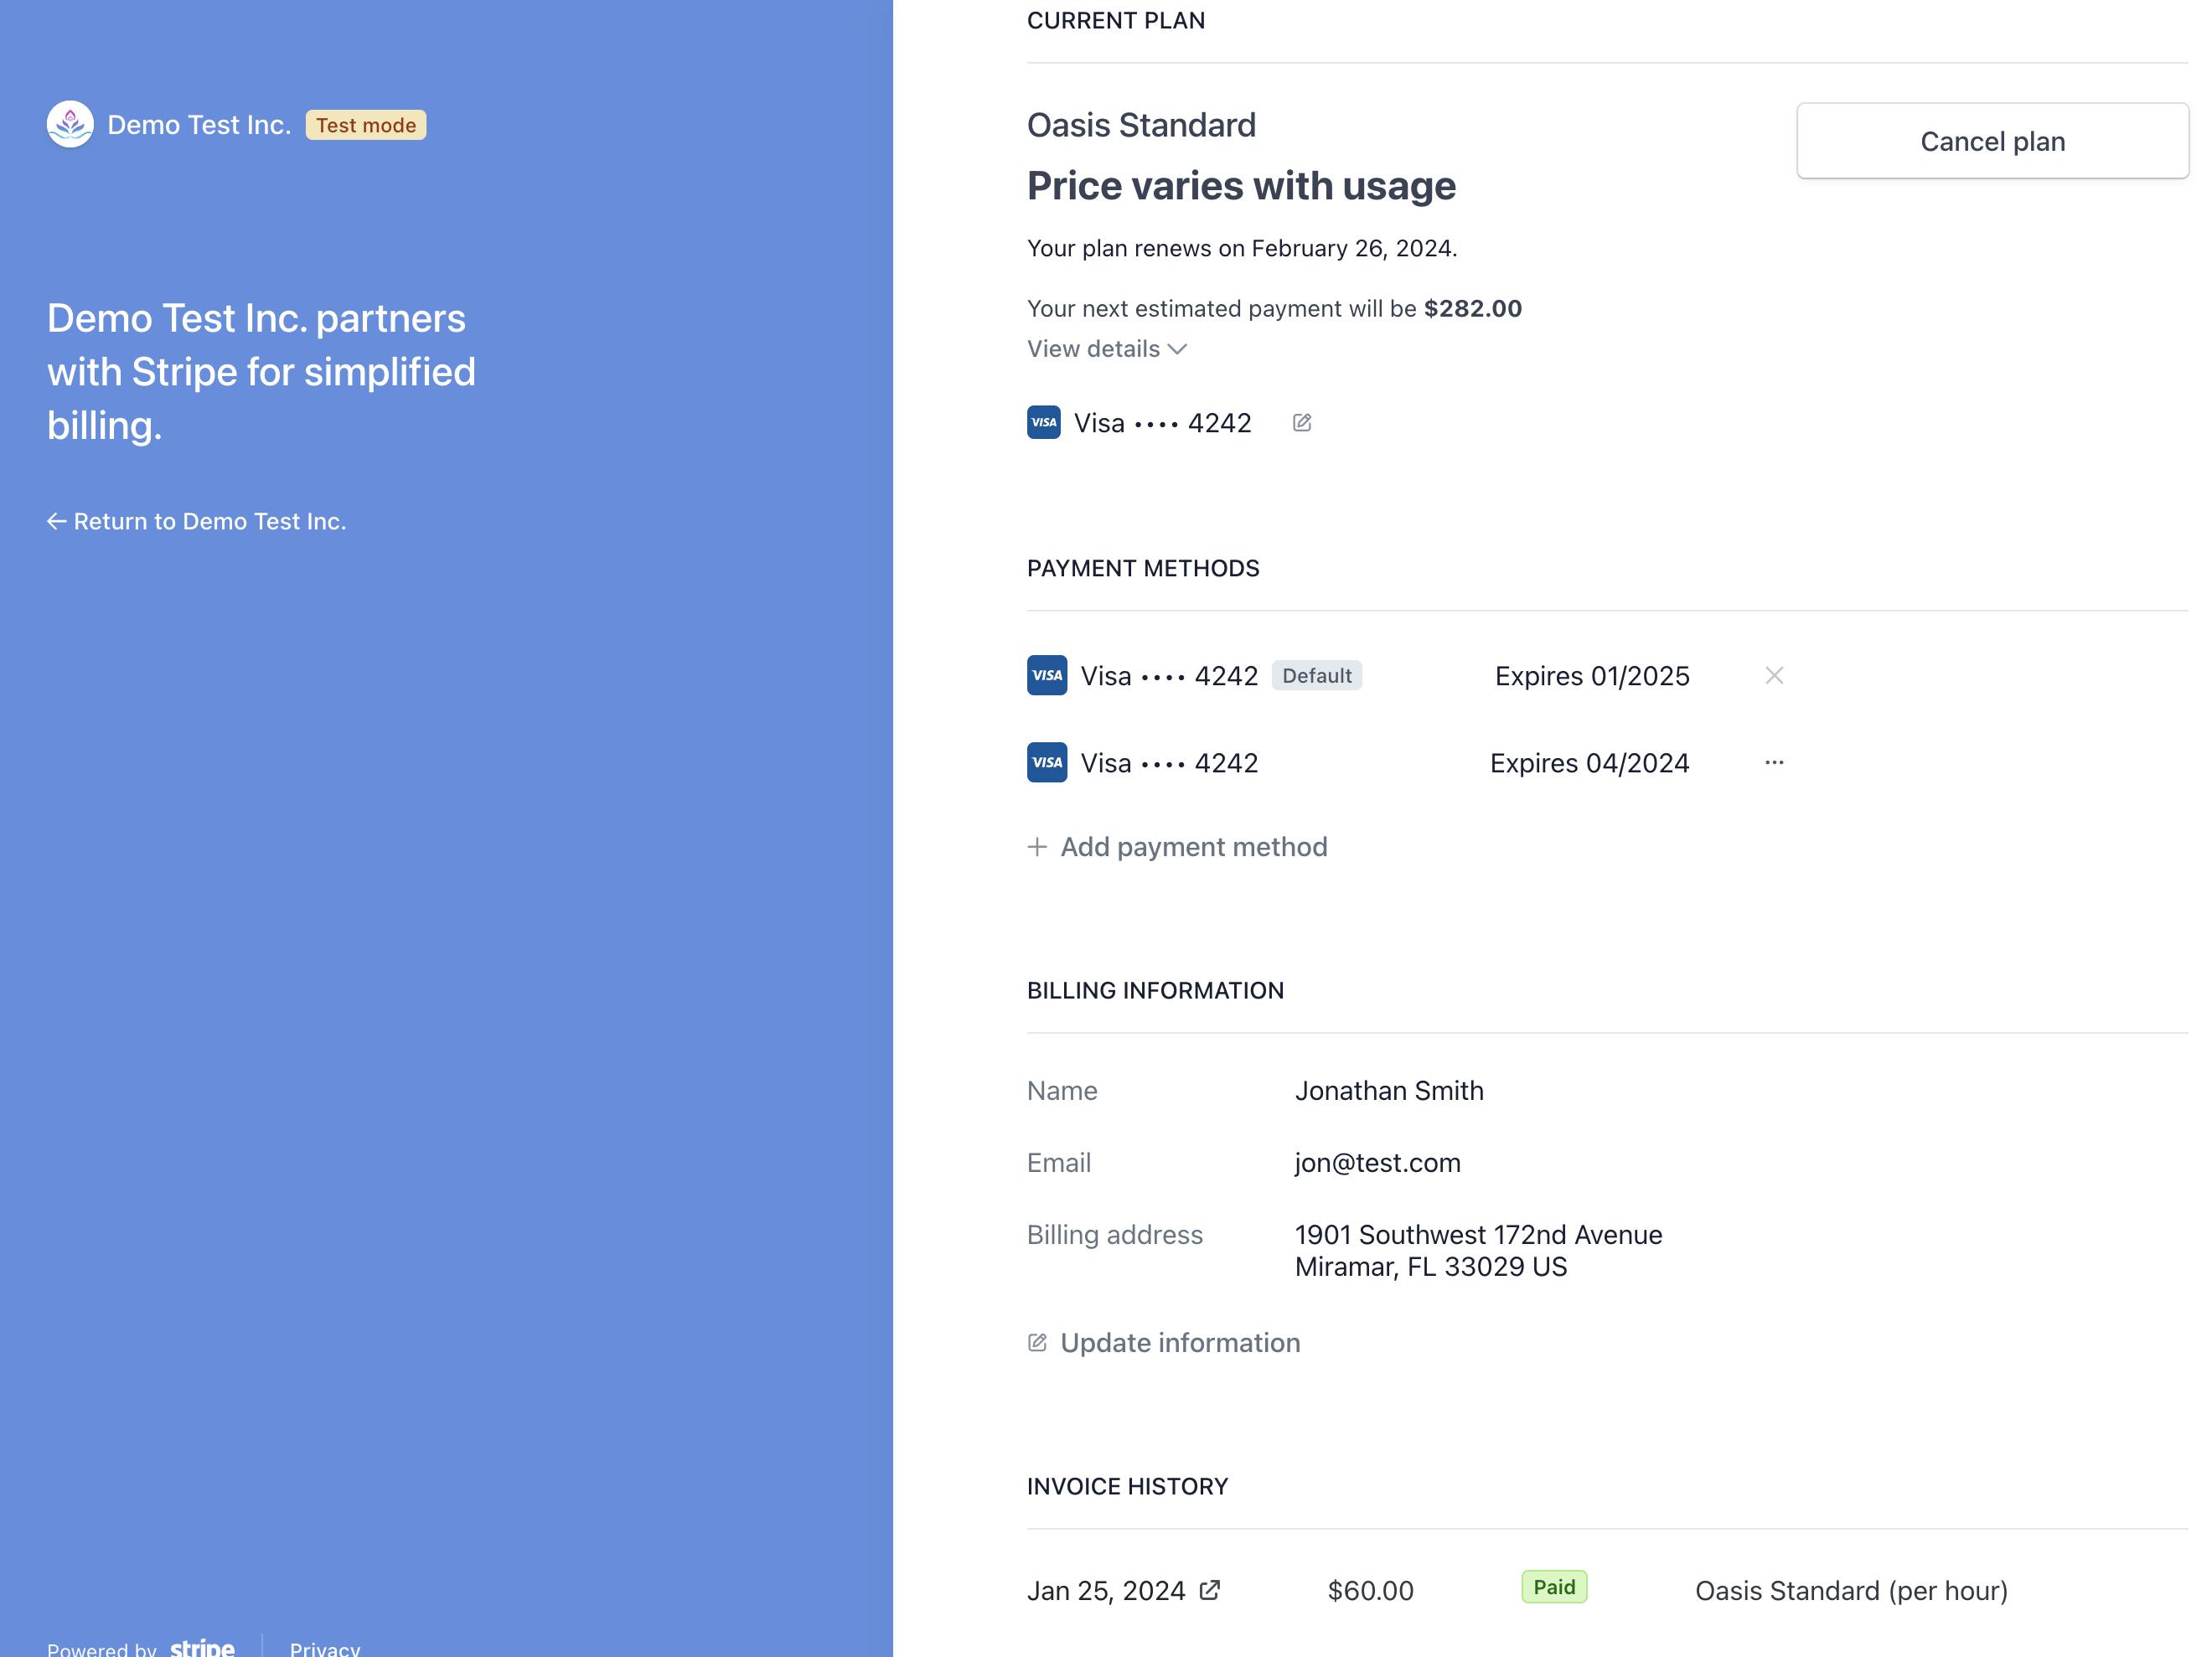
Once a customer is redirected to the portal, they’ll be able to manage their subscription details through a Stripe hosted page.
Reporting Usage
At this stage, the Oasis Hubs website is set up to process subscriptions so the missing piece in our metered billing story is tracking the hours used when customers book workspaces.
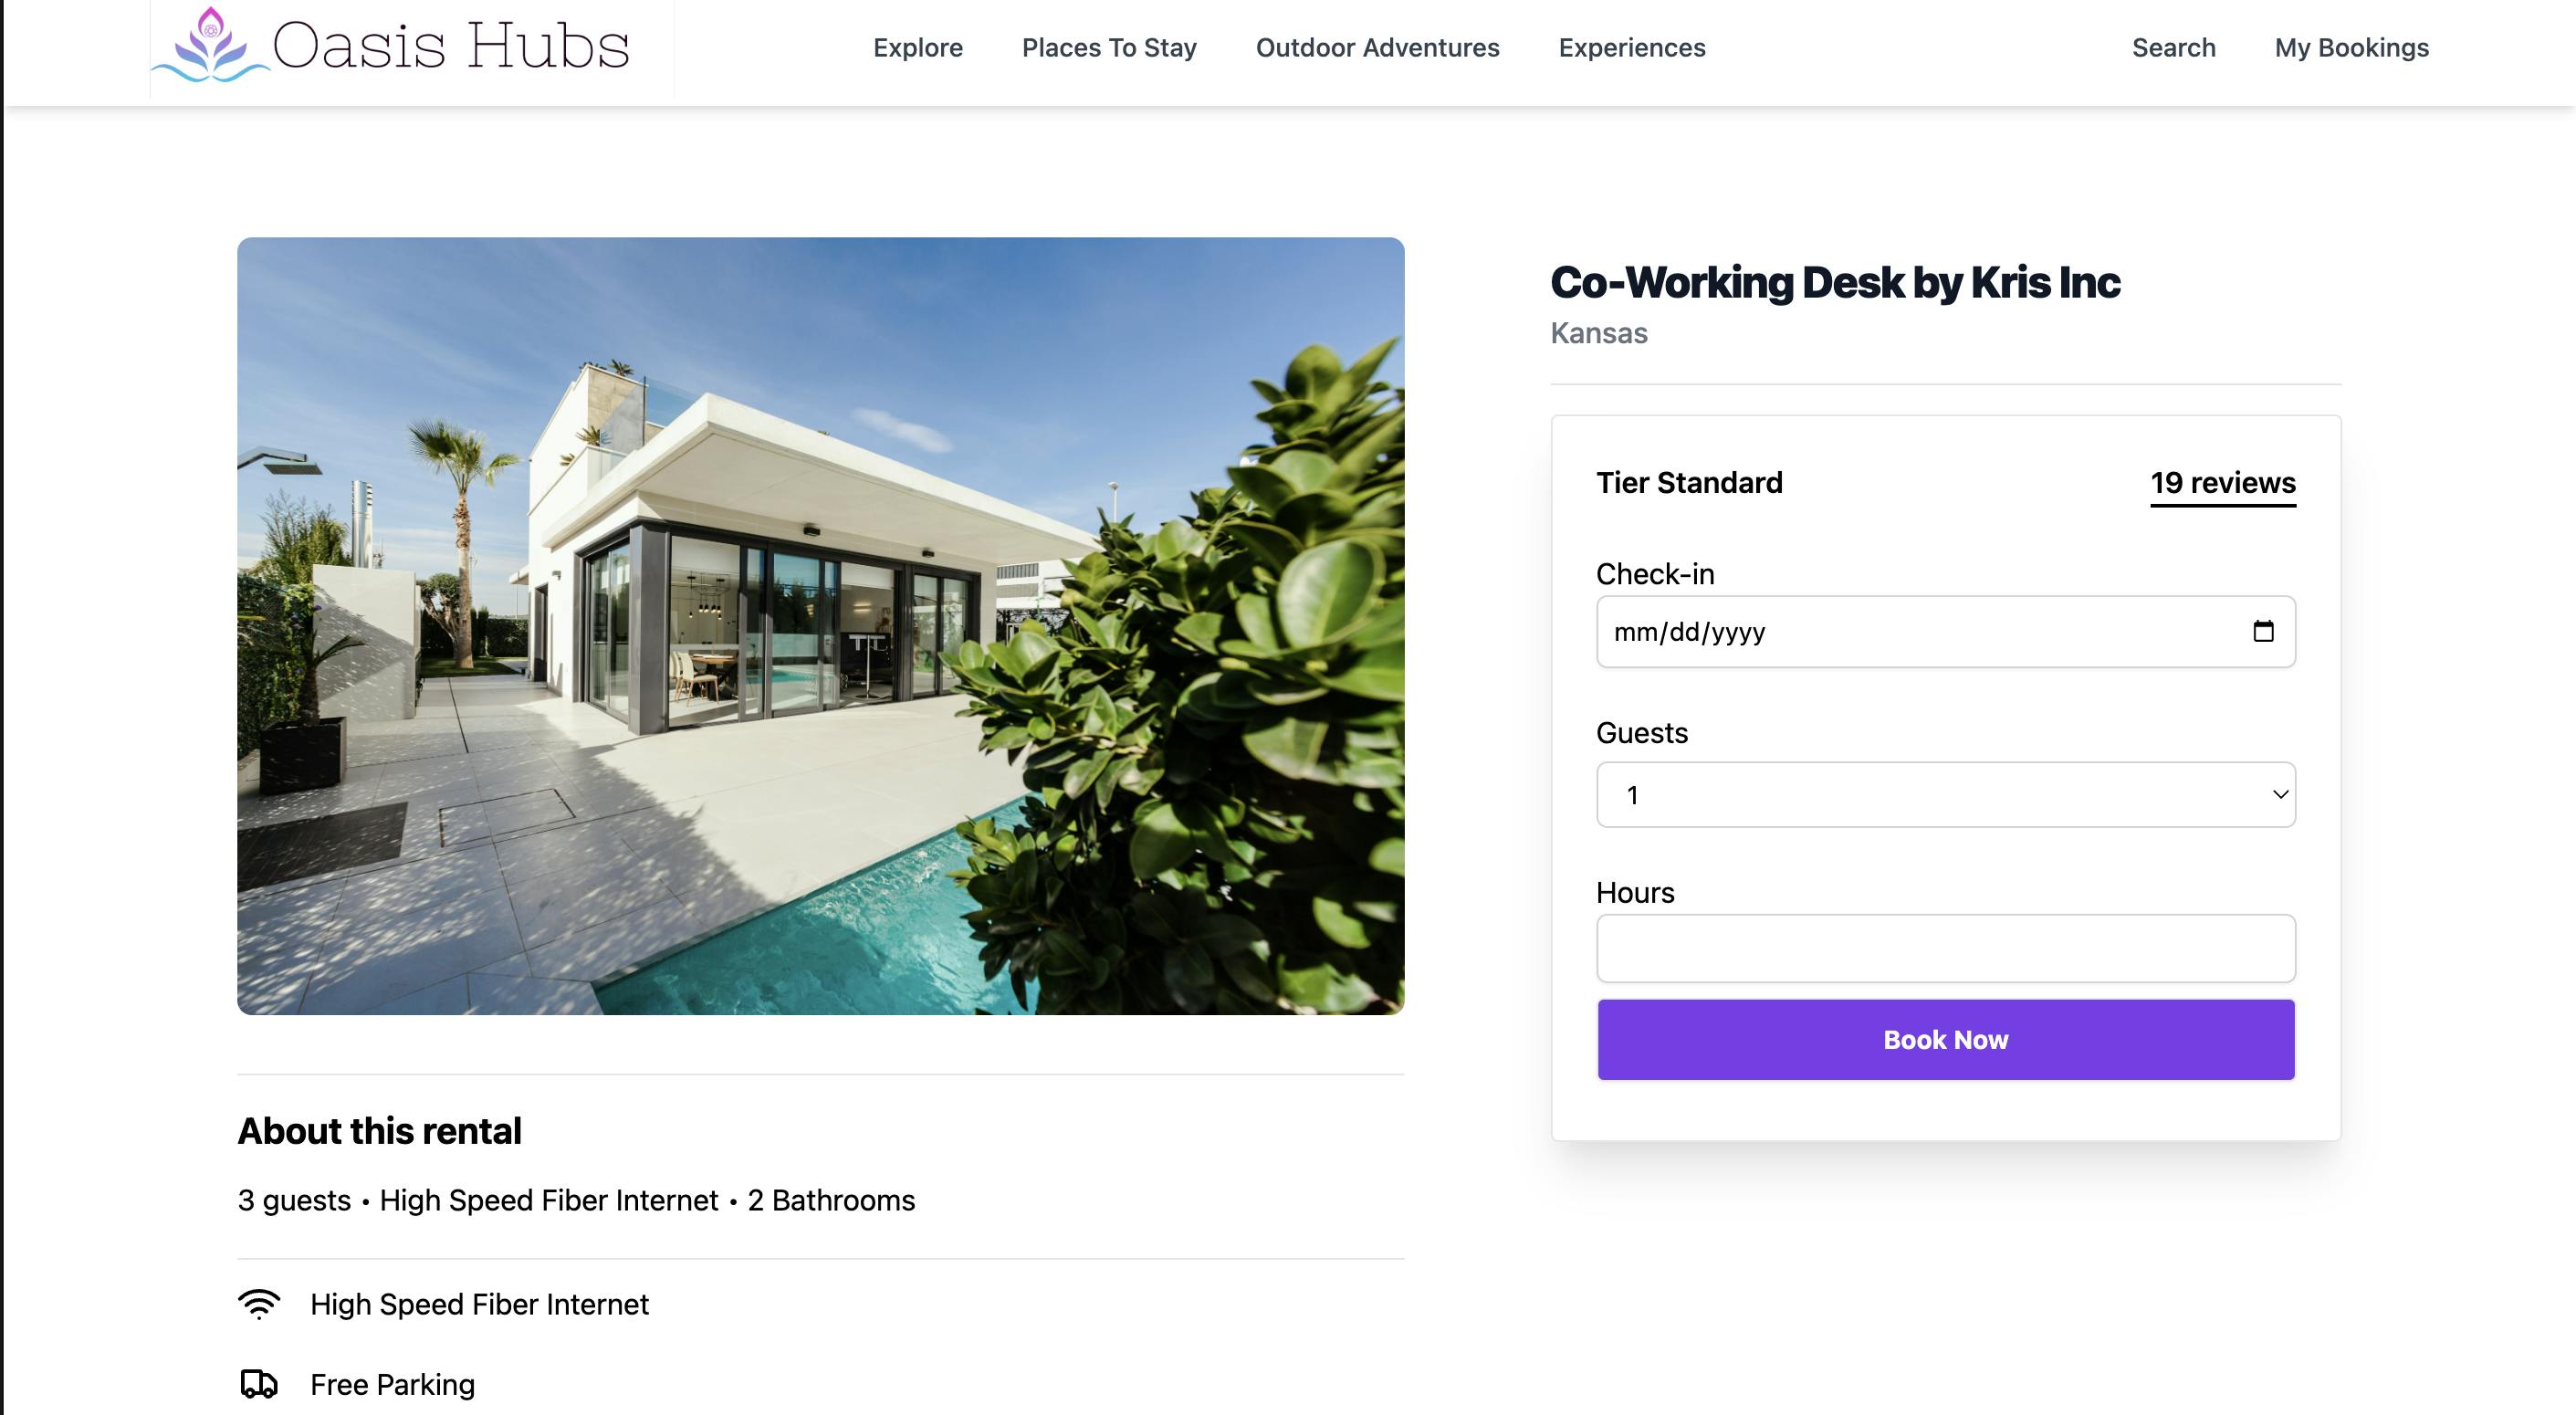
For the purpose of keeping the demo relatively simple, collect usage at the time of booking. In a more realistic scenario we’ll want to implement a more robust check in/out system. On the details page for a workspace listing, provide a simple form where customers can enter a check in date, number of guests, and how many hours they want to use. The handler method on our Razor Page handles the request processing.
var checkInDate = DateTimeOffset.Parse(Request.Form["checkInDate"].ToString());

var hours = int.Parse(Request.Form["hours"].ToString());
var booking = new Booking {
  RenterId = renterId,
  RentalId = Request.Form["rentalId"].ToString(),
  Hours = hours,
  ReservedDateUtc = checkInDate.ToUniversalTime()
};

await using
var context = await this._dbContextFactory.CreateDbContextAsync();
context.Bookings.Add(booking);
await context.SaveChangesAsync();
Once the request has been validated, create a new record in the bookings table of our database using Entity Framework Core.
// retrieve subscription
var subscriptionService = new SubscriptionService(this._stripeClient);
var subscription = await subscriptionService.GetAsync(OasisUser.ActiveSubscriptionId);

  var subItem = subscription.Items.Data.Single(s =>s.Price.LookupKey.EndsWith("_tiered"));

  // report on usage
  var ucOptions = new UsageRecordCreateOptions {
    Quantity = hours,
    //Timestamp = DateTime.UtcNow,
    Action = "increment"
  };
  var idempotencyKey = Guid.NewGuid().ToString("N");
  var requestOptions = new RequestOptions {
    IdempotencyKey = idempotencyKey
  };

  var usageRecordService = new UsageRecordService(this._stripeClient);
  await usageRecordService.CreateAsync(subItem.Id, ucOptions, requestOptions);
To report the customer’s usage for the subscription, make use of two additional service classes from Stripe .NET; SubscriptionService and UsageRecordService.
Using the ActiveSubscriptionId property of our logged in user, we retrieve the Subscription object from Stripe with the SubscriptionService. If you recall, each subscription has two prices, but here we’re only interested in the tiered price. Then we create a usage report by populating an instance of the UsageReportCreateOptions object with the number of hours being booked and setting the action to “increment”. We supply the UsageRecordService with the UsageReportCreateOptions instance and the Id of the subscription item that represents the tiered price.
At the end of the billing cycle, Stripe will automatically finalize the invoice and charge the saved payment method for the customer. As you can imagine, this will generate a variety of events that can be subscribed to and handled via webhooks. As shown in an image earlier in this article, one of the events Oasis Hubs is particularly interested in is the “invoice.paid” event. Here we can refresh the customer status if necessary and distribute funds to our hosts.
Paying the connected accounts
We have previously discussed the registration flow hosts onboarding with Oasis Hubs. They are associated with regular Customer objects in Stripe as well as Stripe Connect Express accounts. When hosts create listings for workspaces, a database record is created that contains a field for the Id of the Connect account it’s associated with.
public class HubRental {
   public string Id { get; set; } = Guid.NewGuid().ToString("N");
   public required string Title { get; set; } = string.Empty;
   public string Description { get; set; } = string.Empty;
   public string Location { get; set; } = string.Empty;
   public int Capacity { get; set; }
   public RentalType HubType { get; set; } = RentalType.Other;
   public RentalTier HubTier { get; set; } = RentalTier.Basic;
   public string ImageUrl { get; set; } = string.Empty;
   public string StripeAccountId { get; set; } = string.Empty;
   public required string ReferenceCode { get; set; } = string.Empty;
   public bool IsActive { get; set; } = true;
}

public enum RentalTier { Basic, Standard, Premium }

public enum RentalType { EntireSpace,Room, Desk, Other }
When the “invoice.paid” event is received, we publish a message to the message broker (RabbitMQ) that instructs our system to start the payment distribution process for the Connect accounts. Within the process, we retrieve the customer, workspace listing, and booking records from the database. Then we do some math to determine how much money each account is owed. After that, we initiate a transfer using Stripe .NET.
var transOptions = new TransferCreateOptions {
  Amount = transferAmount,
  Currency = "usd",
  Destination = accountId,
  SourceTransaction = command.Invoice.ChargeId,
  Metadata = new Dictionary < string,
  string > { ["invoice.id"] = command.Invoice.InvoiceId,
    ["invoice.hours.total"] = totalReportedHours.ToString(CultureInfo.InvariantCulture),
    ["invoice.hours.account_reported"] = reportedAccountHours.ToString(CultureInfo.InvariantCulture),
    ["invoice.hours.percentage"] = accountHoursPercentage.ToString(CultureInfo.InvariantCulture)
  }
};

await transferService.CreateAsync(transOptions, cancellationToken: cancellationToken);
I left out the math part. That’s pretty boring anyway and you didn’t come here for that. However, the snippet above shows the code required to tell Stripe to begin the transfer process. We create a TransferCreatedOptions instance and provide it with the amount, currency, and the account Id of the Connect account that the funds should be sent to. For record keeping purposes, we also assign the “SourceTransaction” property so we can know what invoice payment these transferred funds are associated with.
At this point, the Oasis Hubs integration with Stripe has most of the functionality needed to run the business. Customers and hosts are able to sign up and go through onboarding. The subscriptions have been set up using Products and Prices objects. Customers can choose a subscription and report the hours they’ve used. Then we just saw how to pay hosts using the TransferService in Stripe .NET. In the next article of this series, we learn how to test out our subscription logic using test clocks.
References
- Oasis Hubs GitHub Repository
- Stripe Connect
- Stripe Connect guide
- Stripe Connect Account Types
- Stripe CLI
Stay connected with Stripe
You can also stay up-to-date with Stripe developer updates on the following platforms:
📣 Follow @StripeDev on Twitter. 📺 Subscribe to our YouTube channel. 💬 Join the official Discord server. 📧 Sign up for the Developer Digest.

